De nombreux utilisateurs rencontrent un problème où Steam ne parvient pas à télécharger votre temps. Il indique que les serveurs de contenu sont inaccessibles pour le téléchargement. Il est sûr de dire que ce problème n'est causé par aucun problème en particulier en raison de nombreuses configurations des utilisateurs. Nous avons répertorié certaines des solutions qui incluent toutes les méthodes du support Steam ainsi que celles des utilisateurs.

Solution 1: suppression des paramètres de proxy
Un serveur proxy est utilisé dans les organisations où l'accès Internet ouvert est restreint. Un proxy est utilisé pour suivre le réseau et fournir une passerelle alternative aux utilisateurs. Les paramètres de proxy deviennent souvent un obstacle lorsque Steam tente de se connecter à ses serveurs pour le téléchargement.
Il existe deux façons de désactiver le proxy sur votre ordinateur.
Méthode 1: Chrome
- Ouvrez le navigateur Chrome et cliquez sur le menu Chrome (en haut à droite) lors de l'ouverture.

- Une fois le menu déroulant, cliquez sur Paramètres .

- Une fois la page Paramètres ouverte, tapez « proxy » dans la barre de dialogue présente en haut.

- À partir des résultats de la recherche, sélectionnez le résultat qui dit « ouvrir les paramètres de proxy ».

- Lorsque les paramètres sont ouverts, cliquez sur « Paramètres LAN » dans l'onglet Connexions, présent en bas.

- Décochez la ligne qui dit « Détecter automatiquement les paramètres ». Enregistrer les modifications et quitter. Redémarrez Steam.

Méthode 2: via les paramètres réseau
- Appuyez sur le bouton Windows + R pour afficher l'application Exécuter.
- Dans la boîte de dialogue, tapez «inetcpl. cpl ».

- Les propriétés Internet s'ouvriront. Accédez à l'onglet Connexions et cliquez sur Paramètres LAN.
- Une fois dans les paramètres LAN, décochez la ligne qui dit « Détecter automatiquement les paramètres» . Enregistrez les modifications et quittez pour relancer Steam.
Solution 2: désactivation des extensions Chrome
Parfois, les extensions présentes dans Chrome peuvent créer un véritable obstacle. Ils interfèrent avec les paramètres de votre réseau, en particulier le module complémentaire nommé « Ghostery ». Il surveille votre réseau et fournit des statistiques sur l'endroit où vous laissez votre empreinte numérique. Cela vous permet même de contrôler quels sites Web peuvent accéder à vos données et quels sites Web ne le peuvent pas. Il est conseillé de désactiver ces modules complémentaires de Chrome avant de procéder au téléchargement. Si le problème était causé par eux, il serait résolu.
Cela n'inclut pas seulement les extensions Chrome, vous devez désactiver TOUT programme lié à votre réseau (moniteur de données, VPN, etc.). Il vaut mieux essayer plutôt que de poursuivre avec les autres solutions qui sont plus complexes.

Solution 3: changer votre région de téléchargement
L'un des correctifs de base comprend la modification de la région de téléchargement.
Le système de contenu Steam est divisé en différentes régions. Le client détecte automatiquement votre région via votre réseau et la définit par défaut. Parfois, les serveurs d'une région spécifique peuvent être surchargés ou subir une défaillance matérielle. Ainsi, changer la région de téléchargement peut résoudre le problème en question. Vous pouvez toujours essayer de changer les régions de téléchargement plusieurs fois (ce n'est pas seulement limité à un essai) avant de poursuivre avec d'autres solutions.
- Ouvrez Steam et cliquez sur ' Paramètres ' dans le menu déroulant dans le coin supérieur gauche de la fenêtre.
- Sélectionnez « Téléchargements » et accédez à « Télécharger la région ».
- Sélectionnez d'autres régions que la vôtre et redémarrez Steam.

Solution 4: suppression de clientregistry.blob
Le registre client de votre Steam peut être corrompu et cela peut être la raison pour laquelle vous êtes confronté à l'erreur. Nous pouvons essayer de le renommer / le supprimer.
- Quittez complètement Steam et terminez toutes les tâches comme mentionné dans la solution ci-dessus.
- Accédez à votre répertoire Steam. La valeur par défaut est C: \ Program Files \ Steam .
- Localisez ' clientregistry.blob' .

- Renommez le fichier en « clientregistryold.blob » (ou vous pouvez supprimer complètement le fichier).
- Redémarrez Steam et permettez au fichier d'être recréé.
Espérons que votre client fonctionnera comme prévu. Si cela ne fonctionne toujours pas, suivez les étapes ci-dessous.
- Revenez à votre répertoire Steam.
- Localisez 'Steamreporter. exe '.

- Exécutez l'application et relancez Steam.
Solution 5: Effacer votre file d'attente de téléchargement Steam
Si vous avez beaucoup de téléchargements en attente dans votre client Steam, il est conseillé de les supprimer tous sauf un et de relancer Steam.
- Ouvrez votre client Steam dans l' onglet Bibliothèque .
- En bas, vous verrez une option cliquable qui dit " Téléchargement suspendu ". Cliquez dessus pour que toutes les options mises en file d'attente s'affichent.

- Un par un, cliquez sur le bouton comme indiqué dans l'image ci-dessous pour supprimer les éléments de la file d'attente.

- Une fois que vous les avez supprimés, faites un clic droit sur les jeux (sauf celui que vous souhaitez télécharger en premier) pour que les paramètres soient avancés. Une fois les paramètres ouverts, cliquez sur le bouton « Désinstaller ».

- Steam vous demandera de confirmer vos actions. Cliquez sur Supprimer lorsque l'invite s'affiche et redémarrez Steam avant d'essayer de télécharger à nouveau ce jeu.

Solution 6: Utilisation de la configuration de rinçage
Nous pouvons essayer d'exécuter la commande flush config pour réinitialiser la configuration. Suivez les étapes ci-dessous.
- Appuyez sur Windows + R pour afficher l'application Exécuter.
- Dans la barre de dialogue, saisissez « steam: // flushconfig ».

- Appuyez sur OK . Steam va maintenant ouvrir une fenêtre pour confirmer vos actions. Appuyez sur Ok et redémarrez Steam.

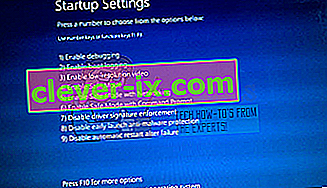
Solution 7: Démarrer Steam en mode sans échec avec mise en réseau.
Before resorting to more technical methods, you can try running your PC in safe mode (with networking) and try to start the Steam download.
- Get your computer to safe mode by selecting from various options available. Select ‘Enable Safe Mode with Networking’. You can learn how to get your PC to safe mode from here. If you are running Windows 7, press F8 upon the startup of your PC and you will be directed to a similar window where you can select the required option.
- Open Steam and try updating/installing with it again. This method should remove all obstacles (if any) which your Steam may be experiencing.

Solution 8: Disabling Safe-web from router
Your WiFi router may have a setting called safe-web in it. What this does is filter all the incoming data it deems are not trustworthy. It is very common for it to flag Steam as one and disrupts the connection with your computer.
Since there are hundreds of different routers used by the users, it is very difficult to list the solution on how to disable the option for every one of them. Here are some guidelines so you can have an idea.
- Web Safe can be found in the parental control section on the WiFi router configuration.
- It can also be found on the Virus section or the Filtering section.
- To enter your router settings, type the IP which is associated with it (for example for some it is 192.168.1.1). You can check the required IP either by calling your modem provider or by looking at the back of the device ( even its packaging box may have details).
Solution 9: Disabling Anti-virus and Defender/firewall
Before proceeding to reinstall Steam, we can try meddling with the antivirus. Antivirus monitors each packet of your computer sends and receives. Although Steam has collaborated with most of them so they don’t give problems, sometimes they do. The solution is to disable/uninstall them and check if you are able to download then.
McAfee Antivirus:
McAfee has no way to exclude certain files from its real time scanning. The only way is to disable the antivirus entirely until the game is updated. To do this, open McAfree and select “Virus and Spyware Protection”. Here you find the option of “Real-Time Scanning”. Click that option and turn it off.

Then follow the following instruction to verify integrity of game files.
- Restart your computer and relaunch Steam.
- Head over to the library section and right click on the game which is giving you problems.
- Click on its properties and select the local files tab.
- Click the verify integrity of game files button and Steam will verify that game in a few minutes.
Hopefully, after performing the above steps, your Steam won’t give any issue.

ESET NOD32
NOD32 has the tendency to mark some application files as malicious and will most probably quarantine it. This often results in the error while updating a game. Browse to your current Steam directory and copy the address
- The default location for your steam folder should be “C:\Program Files (x86)\Steam”.
Press ⊞ Win + R button. This should pop-up the Run application.
In the dialogue box write “C:\Program Files (x86)\Steam”.

Or if you installed Steam in another directory, you can browse to that directory and you can proceed with steps mentioned below.
After copying the address open ESET NOD32 and paste the location in exclude from real time scanning.
Follow the ‘verify integrity of game files’ method listed above and you will be all good.

Kaspersky AV
Kaspersky may sometimes flag Steam as an intruder and disable it from making any changes to the hard drive. To fix this, head over to ‘threats and exclusions’. Navigate to ‘trusted zone’ and add Steam.exe as a trusted application. Remember to change the settings to Do not restrict application activity as well as Do not scan opened files.
Follow the ‘verify integrity of game files’ method listed above and restart your computer.

Windows Defender
- Click Windows button and in the search bar type “Windows defender”. Among all the options, there will be an application named “Windows Defender Security Center”. Open it.
- Upon opening, you will find a list of options available in the new window. Select the option “Virus and threat protection”.

- Upon entering the menu, navigate to Virus and Threat Protection Settings. Windows may prompt you to allow administrator access to use this feature. If so, press Yes.

- After entering the required menu, you should search the window which says “Add or remove exclusions”. Click it and you will be navigated to a menu where you can add exclusions. You can exclude folders, extensions, and even files. In this case, we will exclude the whole Steam folder which is located in the directory you downloaded it.

- Click on the option which says “Exclude a folder” and navigate to your Steam directory. The default location for your steam folder should be “C:\Program Files (x86)\Steam”. Once you reach the location select the folder and save changes.
- Restart your computer and run Steam with administrative privileges. Hopefully, your speed issue will be resolved.
Solution 10: Downloading Latest Steam Client
- The default location for your steam folder should be “C:\Program Files (x86)\Steam”.
Press ⊞ Win + R button. This should pop-up the Run application.
In the dialogue box write “C:\Program Files (x86)\Steam”.

Or if you installed Steam in another directory, you can browse to that directory and you can proceed with steps mentioned below.
- Locate the following folders:
Steam.exe (Application)SteamApps (Folder)Userdata (Folder)
- Delete all the other files/folders/applications except the ones mentioned above.
- Head over to the Steam website and download the latest Steam client. Don’t launch the old Steam.exe present in your directory at all. The problem won’t be solved.
- Install Steam using the installer in the same directory as your previous one. Hopefully, after installation, the problem will be solved.
Solution 11: Changing Default Browser
In a weird turn of events, having Chrome or any other browser set as the default browser sometimes causes issues with the download request that Steam sends to its servers. Therefore, in this step, we will be setting internet explorer as our default browser temporarily to make sure that the download proceeds. For that:
- Press “Windows’ + “I” to open settings.
- In settings, click on “Apps” and then select “Default Apps” from the left pane.

- Click on the “Web browser” option and then select “Internet Explorer” from the list.
- Open Steam and check to see if the issue persists.

Solution 12: Removing Steam Content Server Limiter
In certain cases, it was shown that uninstalling Steam Content Server Limiter from the Classical Control Panel interface fixes this issue for a lot of people. Therefore, in this step, we will be doing exactly that. For that:
- Press “Windows’ + “R” to open the Run prompt.
- Type in “Control” and press “Enter”.

- Click on the “Uninstalla Program” option and then right-click on the “Steam Content Server Limiter” and select “Uninstall”.
- After the server limiter is uninstalled, check to see if the issue persists.

Method 13: Changing DNS
In certain situations, the server DNS that the computer is using to communicate with the internet might not be compatible either with the steam servers or it might be facing issues temporarily. Therefore, in this step, we will be changing our DNS servers. For that;
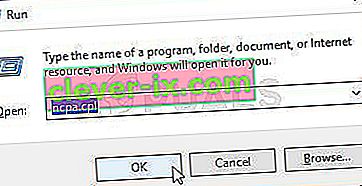
- Press “Windows’ + “R” to open the Run prompt.
- Type in “ncpa.cpl” and press “enter”.
- Right-click on your network adapter and select “Properties”.
- In properties, double click on the “Internet Protocol Version 4(TCP/IPV4)” option and check the “Use following DNS Addresses” option.
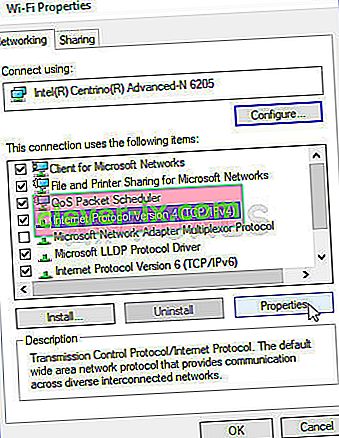
- Type in “8.8.8.8” in the primary DNS address and “8.8.4.4” in the secondary DNS address.
- Click on “OK” and then check to see if the issue persists. If it does, try using “1.1.1.1” and “1.0.0.1” in the fields respectively.


Method 14: Changing Config File
In certain situations, the config file on the computer might require some editing in order to get it some games to start working. The steps listed below are primarily for Mac but you can try them on some older OS such as Windows XP too as some users reported that this fixed it for them.
- Open the Mac Finder and navigate to the following directory.
drive_c/Program Files/Steam/config/
- Launch the “config.vdf” file and wait for it to open.
- Find the following text lines inside the file.
"InstallConfigStore" { "Software" { "Valve" { "Steam" "cip" - Paste the following lines of code under the “cip” entry in the config after creating a new line under it.
CS" "valve511.steamcontent.com;valve501.steamcontent.com;valve517.steamcontent.com;valve557.steamcontent.com;valve513.steamcontent.com;valve535.steamcontent.com;valve546.steamcontent.com;valve538.steamcontent.com;valve536.steamcontent.com;valve530.steamcontent.com;valve559.steamcontent.com;valve545.steamcontent.com;valve518.steamcontent.com;valve548.steamcontent.com;valve555.steamcontent.com;valve556.steamcontent.com;valve506.steamcontent.com;valve544.steamcontent.com;valve525.steamcontent.com;valve567.steamcontent.com;valve521.steamcontent.com;valve510.steamcontent.com;valve542.steamcontent.com;valve519.steamcontent.com;valve526.steamcontent.com;valve504.steamcontent.com;valve500.steamcontent.com;valve554.steamcontent.com;valve562.steamcontent.com;valve524.steamcontent.com;valve502.steamcontent.com;valve505.steamcontent.com;valve547.steamcontent.com;valve560.steamcontent.com;valve503.steamcontent.com;valve507.steamcontent.com;valve553.steamcontent.com;valve520.steamcontent.com;valve550.steamcontent.com;valve531.steamcontent.com;valve558.steamcontent.com;valve552.steamcontent.com;valve563.steamcontent.com;valve540.steamcontent.com;valve541.steamcontent.com;valve537.steamcontent.com;valve528.steamcontent.com;valve523.steamcontent.com;valve512.steamcontent.com;valve532.steamcontent.com;valve561.steamcontent.com;valve549.steamcontent.com;valve522.steamcontent.com;valve514.steamcontent.com;valve551.steamcontent.com;valve564.steamcontent.com;valve543.steamcontent.com;valve565.steamcontent.com;valve529.steamcontent.com;valve539.steamcontent.com;valve566.steamcontent.com;valve165.steamcontent.com;valve959.steamcontent.com;valve164.steamcontent.com;valve1611.steamcontent.com;valve1601.steamcontent.com;valve1617.steamcontent.com;valve1603.steamcontent.com;valve1602.steamcontent.com;valve1610.steamcontent.com;valve1615.steamcontent.com;valve909.steamcontent.com;valve900.steamcontent.com;valve905.steamcontent.com;valve954.steamcontent.com;valve955.steamcontent.com;valve1612.steamcontent.com;valve1607.steamcontent.com;valve1608.steamcontent.com;valve1618.steamcontent.com;valve1619.steamcontent.com;valve1606.steamcontent.com;valve1605.steamcontent.com;valve1609.steamcontent.com;valve907.steamcontent.com;valve901.steamcontent.com;valve902.steamcontent.com;valve1604.steamcontent.com;valve908.steamcontent.com;valve950.steamcontent.com;valve957.steamcontent.com;valve903.steamcontent.com;valve1614.steamcontent.com;valve904.steamcontent.com;valve952.steamcontent.com;valve1616.steamcontent.com;valve1613.steamcontent.com;valve958.steamcontent.com;valve956.steamcontent.com;valve906.steamcontent.com"
- Save your changes and check to see if the issue persists.
Note: Some users reported to fix the issue after having to deleting the CM List IP addresses in the file aswell in addition to pasting this code.


