Le WiFi n'a pas de problème de configuration IP valide peut survenir à tout moment sans aucun avertissement préalable. Certains utilisateurs voient ce message d'erreur lorsqu'ils résolvent leur réseau, tandis que certains utilisateurs sont confrontés à ce message dès qu'ils se connectent à leur ordinateur. Le problème touche principalement les utilisateurs de Windows 10, surtout s'ils ont récemment installé les mises à jour. Vous devriez vérifier la connectivité Internet sur d'autres ordinateurs ou téléphones portables. Si votre ordinateur est le seul appareil avec des problèmes et que d'autres appareils se connectent facilement à votre Wi-Fi, continuez. Sinon, votre problème pourrait provenir du routeur ou de votre fournisseur d'accès Internet.
Ce problème peut survenir pour plusieurs raisons. Cela peut être dû au fait que votre système n'obtient pas d'adresse IP ou que votre connexion est bloquée en raison de problèmes de pilote ou de logiciels malveillants. Comme il existe de nombreuses raisons à cela, il existe également de nombreuses solutions à ce problème. Mais avant de continuer avec eux, assurez-vous de redémarrer votre PC.

Alors, essayez d'abord les méthodes données dans le dépannage général et une fois que celles-ci sont faites, commencez à suivre les solutions données dans les méthodes.
Dépannage du «WiFi» n'a pas d'erreur de configuration IP valide
Ce sont des solutions générales et moins compliquées qui pourraient fonctionner pour vous. Alors, essayez les étapes ci-dessous avant de plonger dans les méthodes compliquées
1. Effectuez un redémarrage propre
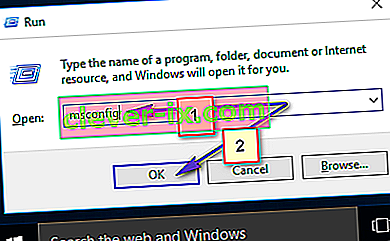
- Maintenez la touche Windows et appuyez sur R
- Tapez MSConfig et appuyez sur Entrée
- Sélectionnez l' onglet Services
- Cochez Masquer tous les services Microsoft
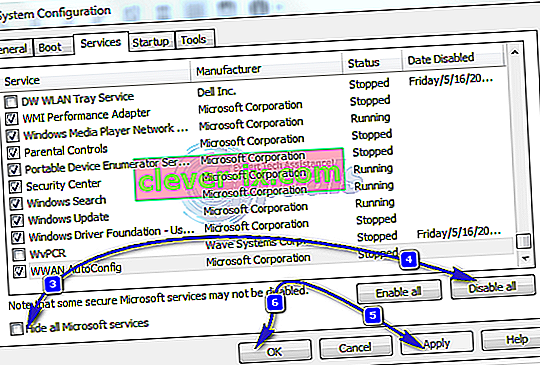
- Cliquez sur Désactiver tout
- Cliquez sur l' onglet Démarrage, puis sélectionnez Ouvrir le gestionnaire de tâches
- Sélectionnez le premier élément présenté dans le Gestionnaire des tâches et cliquez sur Désactiver . Répétez cette étape pour tous les éléments du gestionnaire de tâches
- Fermez la fenêtre du gestionnaire de tâches
- Cliquez sur OK dans l'onglet Démarrage
- Redémarrez votre ordinateur et il démarrera dans l'état de démarrage propre


2. Mettre à jour les pilotes
Vous pouvez mettre à jour, restaurer (au cas où vous avez récemment installé les pilotes) et supprimer les pilotes réseau pour vérifier si ce sont les pilotes à l'origine du problème
- Maintenez la touche Windows et appuyez sur R
- Tapez devmgmt. msc ou hdwwiz.cpl et appuyez sur Entrée
- Recherchez et double-cliquez sur Cartes réseau
- Localisez votre carte réseau et double-cliquez dessus
- Cliquez sur le pilote onglet et cliquez sur Mettre à jour le pilote ... bouton
- Sélectionnez Rechercher automatiquement le logiciel du pilote mis à jour et suivez les instructions supplémentaires à l'écran.

3. Pilotes de restauration
- Maintenez la touche Windows et appuyez sur R
- Tapez devmgmt. msc ou hdwwiz.cpl et appuyez sur Entrée
- Recherchez et double-cliquez sur Cartes réseau
- Localisez votre carte réseau et double-cliquez dessus
- Cliquez sur l' onglet Pilote, puis sur Restaurer le pilote… et suivez les instructions supplémentaires à l'écran
- Si le bouton " Roll Back Driver" est grisé, cela signifie que vous ne pouvez pas restaurer le pilote, donc cette option n'est pas pour vous

4. Désinstaller les pilotes
La désinstallation et le redémarrage de votre système forceront Windows à installer automatiquement le pilote le plus compatible, car Windows est livré avec un tas de pilotes généraux.
- Maintenez la touche Windows et appuyez sur R
- Tapez devmgmt. msc et appuyez sur Entrée
- Recherchez et double-cliquez sur Cartes réseau
- Localisez votre carte réseau et double-cliquez dessus
- Cliquez sur l' onglet Pilote et cliquez sur Désinstaller et suivez les instructions supplémentaires à l'écran
- Une fois le pilote désinstallé, redémarrez votre ordinateur

5. Désactivez ou désinstallez l'antivirus
Votre antivirus peut être à l'origine du problème, alors sa désinstallation ou sa désactivation pendant un certain temps vous aidera à déterminer si le problème était dû ou non à l'antivirus.
- Faites un clic droit sur l'icône Antivirus dans la barre d'état système (située dans le coin inférieur droit)
- Sélectionnez Désactiver. Si vous ne voyez pas cette option, vous verrez l'option d'ouvrir le programme antivirus. Sélectionnez cette option, puis sélectionnez Désactiver
Si vous souhaitez désinstaller le logiciel, procédez comme suit
- Maintenez la touche Windows et appuyez sur R
- Tapez appwiz. cpl et appuyez sur Entrée
- Localisez votre application antivirus et cliquez dessus
- Cliquez sur Désinstaller et suivez les instructions à l'écran
Il est conseillé d'utiliser un outil de suppression d'application pour désinstaller complètement l'antivirus afin de s'assurer qu'il ne reste plus de fichiers résiduels.
Remarque: il s'agit uniquement de vérifier si le problème est dû à l'antivirus ou non. Une fois que vous avez vérifié, il est conseillé de réinstaller l'antivirus pour vous assurer que vous êtes à l'abri des virus.
6. Restaurer le pare-feu Windows à ses paramètres par défaut
La restauration du pare-feu Windows à sa valeur par défaut est connue pour résoudre le problème pour quelques utilisateurs, alors essayez ceci avant de suivre les méthodes ci-dessous.
- Maintenez la touche Windows et appuyez sur R
- Tapez pare-feu. cpl et appuyez sur Entrée
- Cliquez sur Restaurer les paramètres par défaut puis cliquez sur Restaurer les paramètres par défaut bouton
- Cliquez sur Oui s'il demande l'autorisation

7. Libération et renouvellement de l'adresse IP
La libération et le renouvellement de votre adresse IP à partir de l'invite de commande résout généralement ce problème. Suivez donc les étapes ci-dessous pour libérer et renouveler votre adresse IP.
- Appuyez une fois sur la touche Windows
- Tapez cmd dans la zone Rechercher. OU choisissez PowerShell (administrateur) et tapez cmd dans PowerShell avant de passer à 4.
- Cliquez avec le bouton droit sur l'invite de commandes et cliquez sur Exécuter en tant qu'administrateur…
- Tapez la commande suivante et appuyez sur «Entrée».
ipconfig / release
- Tapez la commande suivante et appuyez sur «Entrée».
ipconfig / renouveler
- Tapez Exit et appuyez sur Entrée

Maintenant, vérifiez votre Wi-Fi et cela devrait fonctionner correctement.
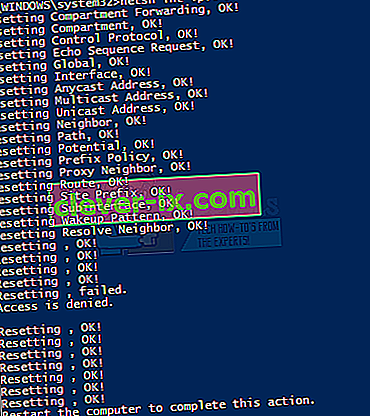
8. Réinitialiser la pile TCP / IP
Resetting the TCP/IP stack is also known to solve this problem for many users and it has been suggested by the Microsoft Officials as well. There are a total of 3 commands that you will need to run in Command Prompt. The first command will reset the Winsock entries while the other two will rewrite registry keys that are used by the TCP/IP.
- Press Windows key once
- Type cmd in the Start Search box
- Right-click on the Command Prompt and click Run as administrator…
- Type the following command and press “Enter”.
netsh winsock reset catalog

- Type in the following command and press “Enter”.
netsh int ipv4 reset reset.log
- Type in the following command and press “Enter”.
netsh int ipv6 reset reset.log


Once you are done, restart your computer and check whether you’re getting the same error or not.
9. Manually Entering the IP Information
Since there is a problem with IP configuration, you can always enter the IP and other information manually. The problem is happening because your system isn’t getting a valid IP for some reason so putting this information manually solves the problem for many users.
Follow the steps given below to manually enter your IP information.
- Hold Windows key and press R
- Type ncpa.cpl and press Enter
- Locate the network that isn’t working
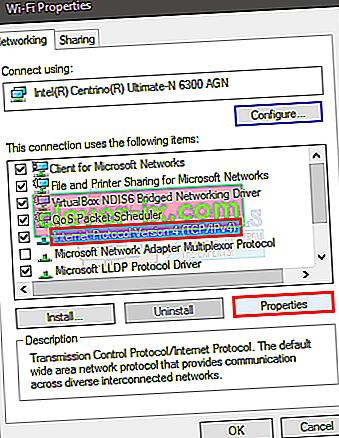
- Right-click the network that you want to fix and click Properties
- Select Internet Protocol Version 4 (TCP/IPv4)
- Click Properties
- Select Use the following IP addresses
- Enter 192.168.1.x in IP address (replace x with any number I replaced it with 10)
- Enter 255.255.0 in Subnet Mask
- Enter 192.168.1.1 in Default Gateway
- Click Use the following DNS server addresses
- Enter 8.8.8.8 in the Preferred DNS server
- Enter 8.8.4.4 in the Alternate DNS server
- Check the option that says Validate upon exit
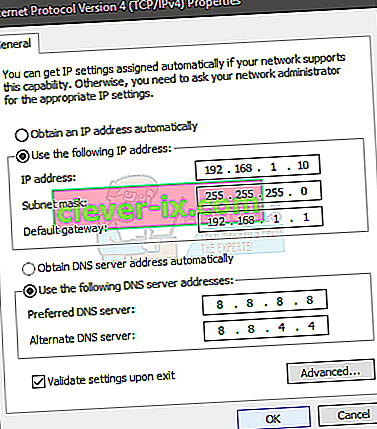
- Click Ok then click Ok again


10. Check for Infections
There’s a possibility that you have been infected and the virus is blocking your connection. This is an extreme but plausible case and is known to be the reason for a few users so it’s always advised to check for any viruses as well.
If all the above-mentioned methods didn’t work then it’s time to check your system for any infections.
- Use an Antivirus to scan your computer thoroughly. You can use any Antivirus but we recommend Malware Bytes. Go here and download the Malware Bytes for your computer and install it.
- Scan your computer and see if it gets any infections. If Malware Bytes catches some bad files then delete those and then check if the issue is still there or not.
11. Changing SSID and Password
In some cases, the Wifi Password and name configuration on the router might have gotten corrupted over time or it might be in the need of a refresh. Therefore, we will be logging into our router’s page and then try to change the SSID and password in hopes of refreshing this config to fix the issue. For that:
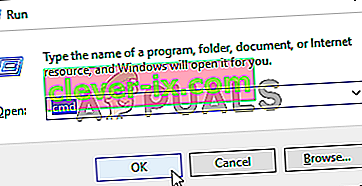
- Press “Windows’ + “R” to open the Run prompt.
- Type in “cmd” and press “enter”.
- Type in the following command inside the command prompt.
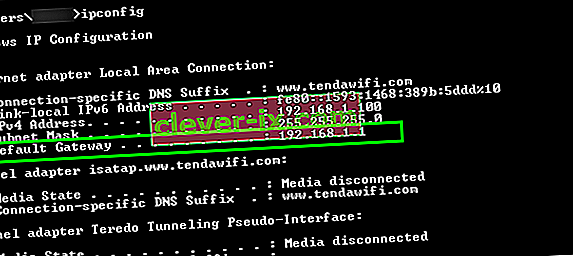
/ipconfig
- Check the IP address listed under the “Default Gateway” heading and copy it after highlighting it with your mouse.
- Open your browser and paste the IP address in the address bar on the top.
- Your Router’s login page should open now, get ahold of your router and you should find the login password and name on its back.
Note: By default, the password and name are most likely “admin”.
- After logging into your router’s page, look around for the SSID and Password settings.
- They should most probably be in the Wifi section.
- Change the SSID to something different and then change the password as well.
- Check to see if the issue persists after changing the password and SSID.


12. Changing Connection Mode
In certain cases, your Wifi adapter might be set to receive the internet packets from the router in a certain range which might not be perfectly compatible with its capabilities. Therefore, in this step, we will be changing this connection mode to something else. For that:
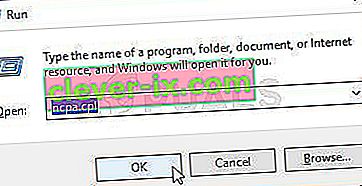
- Press “Windows’ + “R” to open the Run prompt.
- Type in “ncpa.cpl” and press “Enter” to open the network adapter window.
- Right-click on your Wifi connection and select “Properties”.
- Click on the “Configure” option and then select the “Advanced” button.
- Here, Double-click on the “Wireless Mode” option and change its value to something else.
- Try all the options in this list one by one and check which one works for you.

13. Running Troubleshooter
It is possible that the issue might be due to incompatibility or due to a misconfiguration of certain system settings. This can be detected and rectified using the built-in troubleshooter for the network adapters. In order to run the troubleshooter, follow the steps listed below.
- Press “Windows’ + “R” to open the Run prompt.
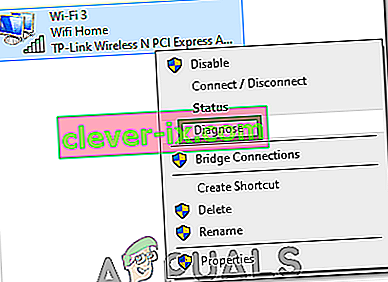
- Type in “ncpa.cpl” and press “Enter” to open the network adapter window.
- Right-click on your Wifi connection and select the “Diagnose” option.
- Wait for the troubleshooter to run and let it detect the issues with the network.
- Check to see if the issue persists.

Note: Furthermore, you can try to reset your network entirely or change the DNS servers.


