L' erreur 0xc000000e lors de la tentative de démarrage de Windows signifie que vous avez affaire à des données de configuration de démarrage corrompues . Les données de configuration de démarrage sont un magasin global pour toutes les options et paramètres liés au démarrage sur les PC Windows plus récents.
Vous obtiendrez cette erreur lorsque vous tenterez de démarrer votre appareil et un écran noir vous sera présenté qui vous expliquera comment réparer votre ordinateur à l'aide d'un disque d'installation ou d'un lecteur de récupération. Malheureusement, avoir ce lecteur de récupération est le seul moyen de résoudre ce problème, vous devriez donc vous en procurer un avant de commencer. Si vous ne l'avez pas, il est assez facile d'en créer un à l'aide de Rufus ou de l' outil de création Windows Media à partir de n'importe quel autre PC ou ordinateur portable.

Vous devrez également démarrer dans votre BIOS pour modifier l'ordre de démarrage et faire démarrer votre PC à partir du lecteur de récupération au lieu de votre disque dur. Pour ce faire, procédez comme suit:
- Entrez les paramètres BIOS ou UEFI en appuyant sur la touche désignée par le fabricant de votre carte mère avant le démarrage de Windows. Cette touche est généralement Echap, Supprimer, F2, F8, F10, F12 ou Backspace, selon le fabricant. Vous pouvez effectuer une recherche en ligne pour savoir comment entrer dans le BIOS, suivi du modèle de votre ordinateur.
- Une fois à l'intérieur, accédez au Boot Utilisez les instructions trouvées dans le BIOS pour modifier votre ordre de démarrage et définissez le CD-ROM ou le port USB comme premier périphérique, selon que votre lecteur de récupération est un CD ou un lecteur flash .
- Enregistrez vos paramètres et quittez.

Méthode 1: reconstruire les données de configuration de démarrage
Pour ce faire, vous devrez démarrer votre ordinateur à partir du lecteur de récupération. Si vous avez configuré votre BIOS avec les étapes ci-dessus, vous pouvez le faire en appuyant sur n'importe quelle touche une fois que l'invite apparaît sur votre écran. Une fois l'ordinateur démarré à partir du lecteur de récupération, procédez comme suit pour reconstruire le BCD:
- Dans la boîte de dialogue Installation de Windows , définissez tout sur les valeurs appropriées, sélectionnez votre langue et cliquez sur
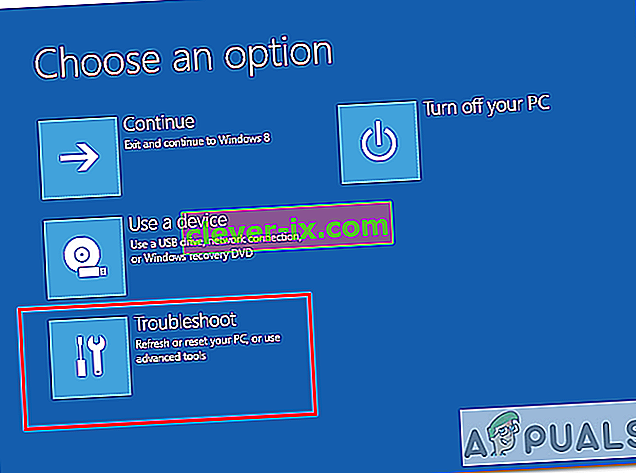
- Dans le coin inférieur gauche, cliquez sur Réparer votre ordinateur , et choisissez Dépanner dans l' écran Choisir une option.
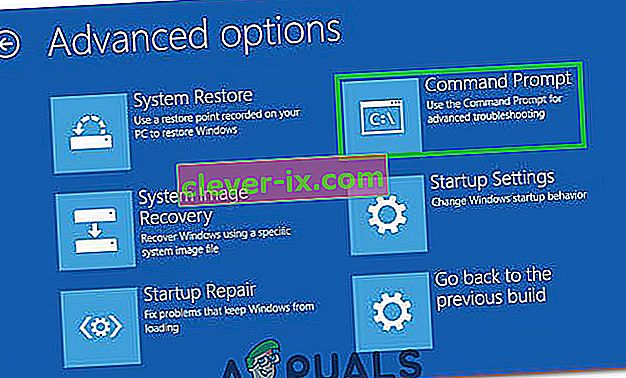
- Dans l' écran Dépannage , cliquez sur Options avancées, puis sur Invite de commandes.
- Lorsque l'invite de commande s'ouvre, tapez les commandes suivantes, en appuyant sur Entrée sur votre clavier après chacune d'elles:
bootrec / scanos bootrec / fixmbr bootrec / fixboot bootrec / rebuildbcd
- Redémarrez votre ordinateur et il devrait démarrer correctement, sans faire face à nouveau au problème.

Méthode 2: réparez votre système d'exploitation avec le lecteur de récupération
Cette méthode réparera également votre système d'exploitation avec l'invite de commande du lecteur de récupération, et vous devriez être en mesure de démarrer sous Windows sans faire face à nouveau au problème. Démarrez à partir du lecteur de récupération et suivez les instructions ci-dessous.
- Suivez les étapes 1 à 3 de la méthode précédente pour accéder à l' invite de commande du lecteur de récupération.
- Une fois à l'intérieur de l'invite de commande, tapez les commandes ci-dessous, suivies d'une entrée sur votre clavier pour les exécuter. L' utilitaire StartRep.exe corrige les valeurs de l'environnement de démarrage et doit corriger l'erreur BCD. Notez que vous devrez peut-être répéter cette étape plusieurs fois en cas d'échec.
cd x: \ sources \ recovery StartRep.exe
- Si l'étape précédente de réparation de Windows n'a pas aidé, tapez bcdedit dans l'invite de commande pour voir les valeurs du gestionnaire de démarrage Windows.
- Notez les valeurs pour Device . S'ils sont inconnus , tapez les commandes suivantes, chacune suivie d'une entrée pour les exécuter. Notez que vous devez remplacer C: par la partition sur laquelle votre système d'exploitation est installé, si nécessaire.
bcdedit / set {DEFAULT.EN_US} partition de périphérique = c: bcdedit / set {DEFAULT.EN_US} partition osdevice = c: bcdedit / set {BOOTMGR.EN_US} partition de périphérique = c:- Lorsque l'invite de commande est terminée, fermez-la, retirez le lecteur de récupération et redémarrez votre système. Il ne devrait pas avoir de problèmes de démarrage maintenant.
Le seul inconvénient de ces solutions est qu'elles nécessitent une récupération, de la patience et des nerfs solides. Cependant, si vous les suivez tels qu'ils sont décrits, vous devez corriger l'erreur que vous avez obtenue et continuer à utiliser votre appareil comme auparavant.
Méthode 3: activer la prise en charge de Windows 10 WHQL dans le BIOS
Le paramètre de prise en charge de Windows 10 WHQL existe dans certains OEM. Il a deux fonctions de base: vérifie les pilotes signés pendant le processus de démarrage et vous permet d'activer la prise en charge UEFI. Si vous utilisez Windows 10, vous devez l'activer pour que votre ordinateur puisse démarrer normalement. Cependant, s'il n'est pas sélectionné, votre ordinateur peut démarrer avec l'erreur 0xc000000e. Ainsi, vous pouvez accéder au BIOS pour voir si le paramètre Windows 10 WHQL Support est activé. Sinon, activez-le pour essayer.
Vous devez noter que le paramètre Prise en charge de Windows 10 WHQL n'est pas pris en charge sur tous les ordinateurs. Si votre ordinateur ne l'a pas, vous pouvez vérifier si la prise en charge UEFI est activée sur votre ordinateur. Sinon, vous pouvez l'activer pour voir si le code d'erreur 0xc000000e disparaît. Pour l'activer:
- Arrêtez complètement votre ordinateur et laissez-le reposer pendant au moins quelques minutes.
- Après vous être assuré que suffisamment de temps s'est écoulé, redémarrez l'ordinateur et vous devriez remarquer l' option « Appuyez sur ce bouton pour démarrer en mode Bios ».
- Appuyez sur le bouton pour démarrer en mode Bios.
- Après avoir démarré avec succès en mode Bios, vérifiez s'il existe un paramètre Windows WHQL dans le Bios.
- S'il est présent, appuyez sur «Entrée» pour le sélectionner après l'avoir mis en surbrillance à l'aide des touches fléchées, et sélectionnez l' option «Activé» pour l'activer sur votre ordinateur.

- Vérifiez si cela résout le problème.

Si l'erreur de démarrage 0xc000000e de Windows 10 apparaît toujours après l'activation du paramètre Prise en charge de Windows 10 WHQL ou de la prise en charge UEFI, vous devrez peut-être réinitialiser la configuration BIOS / UEFI sur votre ordinateur.
Méthode 4: Reconstruire BCD via Easy Recovery Essentials
Easy Recovery Essentials est une fonction de réparation automatisée du système en un clic qui intègre la réparation et la reconstruction complètes du BCD pour résoudre l'erreur «0xc000000e», même dans les cas où Windows ne démarre pas en raison de l'erreur.
Le composant de réparation de démarrage automatique d'EasyRE résoudra tous les problèmes liés au BCD, corrigera le BCD ou le recréera à partir de zéro en utilisant le codage et le chemin corrects pour la partition qui refuse de se charger correctement. Il marquera également le disque comme étant en ligne pour s'assurer qu'il fonctionne correctement.
Easy Recovery Essentials est garanti pour corriger l'erreur «0xc000000e» automatiquement à l'aide de son option de réparation automatisée intégrée. EasyRE est actuellement disponible pour Windows XP, Vista, 7, 8, 10 et il peut être téléchargé et créé sur n'importe quel PC.
- Obtenez un autre ordinateur que vous pourriez utiliser pour créer une clé USB que nous utiliserons pour démarrer l'ordinateur.
- Téléchargez Easy Recovery Essentials à partir d'ici.

- Gravez l'image.
- Démarrez votre PC à partir du CD ou de la clé USB Easy Recovery Essentials que vous avez créé.
- Une fois EasyRE en cours d'exécution, choisissez l' option «Réparation automatisée» et cliquez sur Continuer.
- Une fois qu'EasyRE a analysé les lecteurs de votre ordinateur, identifiez et sélectionnez la lettre de lecteur de votre installation Windows dans la liste, puis cliquez sur l' option de réparation automatisée pour commencer.
- Easy Recovery Essentials commencera à analyser le lecteur sélectionné pour les problèmes. EasyRE testera et tentera de corriger automatiquement les erreurs avec le disque, la partition, le secteur de démarrage, le système de fichiers, le chargeur de démarrage et le registre. Aucune intervention n'est requise, car la réparation d'EasyRE est entièrement automatisée.
- Une fois le processus terminé, EasyRE rendra compte de ses conclusions. Cliquez sur le bouton Redémarrer pour redémarrer votre PC et tester les modifications.

Méthode 5: réinitialiser la configuration BIOS / UEFI
Certains utilisateurs ont déclaré que leur problème d'erreur 0xc000000e était résolu en réinitialisant la configuration BIOS / UEFI. Vous pouvez donc envisager d'essayer cette méthode pour voir si ce problème peut être résolu.
Étape 1. Ouvrez le menu du BIOS
Pour réinitialiser le BIOS aux paramètres par défaut, vous devez accéder au menu du BIOS et rechercher d'abord l'option Paramètres par défaut.
Les utilisateurs de Windows 10 peuvent accéder aux options de démarrage avancées de Windows 10 et accéder au menu du BIOS. Vous pouvez cliquer sur Démarrer -> Alimentation, maintenir la touche Maj enfoncée, puis cliquer sur le bouton Redémarrer pour redémarrer Windows dans l'environnement de récupération Windows. Cliquez ensuite sur Dépannage -> Options avancées -> Paramètres du micrologiciel UEFI, puis cliquez sur Redémarrer pour accéder à l'écran des paramètres du BIOS.
Alternatively, you can also restart your computer normally and press the required key in the startup screen to boot into the BIOS settings window. The hotkey is varied from different computer manufacturers, and it could be F12, Del, Esc, F8, F2, etc.
Step 2. Find the Setup Defaults Option
The name and location of the “Setup Defaults” option may be different from various computers. It generally calls like: Load Default, Load Setup Defaults, Load Default Settings, Load BIOS Defaults, Load Optimal Defaults, etc.
Use the arrow keys on the computer keyboard to find the BIOS setup default option in the BIOS settings screen. You may find it in one of the BIOS tabs.
Step 3. Reset BIOS
After you find the Load Setup Defaults option, you can select it and press the Enter button to start resetting the BIOS to factory default settings in Windows 10.
At last, you can press F10 to save and exit BIOS. Your computer will automatically reboot. If you need to change BIOS settings again in the future, you can follow the same instructions to access BIOS again to change it.
Method 6: Mark Boot Disk As Online
It is possible in some cases, that the disk that you have connected to the computer or the USB that you are trying to boot from has been marked as offline by the computer. Some computers tend to prevent extra applications, hardware, and other things from being able to run as soon as the computer starts because it allows for more convenient and fast startup experience. Therefore, in this step, we will be marking the Disk as online.
You still need to use a bootable USB medium to do this job. We will show you a step-by-step guide here:
- After booting your computer from the bootable USB drive, you need to go to Next > Repair your computer. Then, you will enter WinRE.
- Go to Troubleshoot > Advanced options > Command Prompt.
- Make sure to properly enter your login credentials if you are asked by the computer.
- Type in the following command inside the command prompt to successfully launch the disk part utility on your computer.
diskpart
- Type in either one of the following commands in the next window to list the currently connected disk drives to your computer.
List Disk List Volume
- Once the disks have been listed, you need to identify the disk that contains the Windows operating system and the one that you want to mark as active.
- After identifying it, select the disk using the following command and replacing the alphabet with the driver letter of that disk.
select disk A Select Volume A (Replace A with the Drive Letter)
- After you have successfully selected the disk, you must mark the disk as online in order to initiate the recognization process of the disk at startup. Use the following commands to do that.
Online Disk Online Volume
- Type in the following command to successfully get out of the command prompt and restart your computer after that.
Exit
- Check to see if marking the Disk as online has fixed your issue.

Method 7: Check your data cables, BIOS and drivers
Unplug all HDD data cables, and then plug them again. Revert to the previous drivers and BIOS settings if they were changed, or use “Restore factory settings” option in the BIOS. Make sure to write down all current BIOS settings that were previously selected, just in case it is required to switch back. If the error is caused by a change of the SATA disk controller’s mode in the BIOS or firmware, the fix can be as simple as entering the BIOS and toggling the SATA controller’s “mode” setting. The exact instructions differ from one manufacturer to the other, but the options will resemble what is shown in the screenshots below.
To check the boot order, follow these steps:
- Restart the computer
- Press the necessary key to open the BIOS menu. This key depends on the computer manufacturer and computer model. This is usually listed on the first screen that appears on the monitor. It can be any of the following: Esc, Del, F2, F8, F10 or F12.
- If the screen shows multiple keys, find the key to open “BIOS”, “setup” or “BIOS menu”
- Attempt to toggle between all three (or more) modes until a combination that results in Windows booting successfully once more is found.
Method 8: Boot Windows In Safe Mode
If above solutions didn’t fix the problem, then Start Windows into safe mode. This will start your PC with minimum system requirements, will not load startup programs, add-ons etc. And allow performing troubleshooting steps to fix Boot Error 0xc000000e:
Before you enter the safe mode, you need to enter the Windows Recovery Environment (winRE). To do this, you will repeatedly turn your device OFF, then ON:
- Hold down the power button for 10 seconds to turn off your device.
- Press the power button again to turn on your device.
- On the first sign that Windows has started (for example, some devices show the manufacturer’s logo when restarting) hold down the power button for 10 seconds to turn off your device.
- Press the power button again to turn on your device.
- When Windows restarts, hold down the power button for 10 seconds to turn off your device.
- Press the power button again to turn on your device.
- Allow your device to fully restart and you should boot into the Windows Recovery Environment.
Now that you are in the Windows Recovery Environment, you will follow these steps to take you to safe mode:
- On the Choose an option, screen, select “Troubleshoot” and then “Advanced options.”
- Now click on “Startup Settings” and click on “Restart.”
- After your device restarts, you’ll see a list of options. Select option “4” from the list or press “F4” to enter Safe Mode.

Note: If you need to exit safe mode, simply restart your device, or:
- Press the “Windows logo key + R.”
- Type “msconfig” in the Run box and then select “OK”.

- Select the Boot tab and under Boot options, clear the Safe boot checkbox.

Method 9: Check your disk with CHKDSK utility
If the hard drive has its file integrity compromised, it is possible to use built-in Windows CHKDSK utility to scan the disk and fix the file system errors.
- Connect a USB drive that has been made bootable or insert the Windows Installation Disk on your computer.
- After connecting one of these, boot from that connected device.
- After booting your computer from the device, click on “Next” and then on the “Repair your Computer” option.
- On the next window, click on “Troubleshoot” and then on the “Advanced” Option.

- On the next screen, make sure to select the “CommandPrompt” option to successfully launch into the command prompt.
- Provide the login credentials of your account in order to boot inside the cmd.
- Inside the command prompt, type in the following command to successfully run the check disk utility on your computer.
chkdsk C: /f (Make sure to replace the "C" with the Drive letter of your partition).
- Confirm any on-screen prompts and wait for the scan to be fully completed.
- Check to see if the issue is fixed by performing this step.
Method 10: Disable fast startup Feature
If your computer has been set up to use the Fast Startup feature, you might be getting this error message on your screen because of doing so. The Fast Startup feature is known to malfunction with some operating systems and hardware combinations.
Basically, when enabled, the feature automatically sends some launch configurations to be stored in your RAM to allow for a faster startup as indicated by its name but this configuration data can sometimes be corrupted which can lead to this error on your computer. Therefore, in this step, we will be disabling it completely. For that:
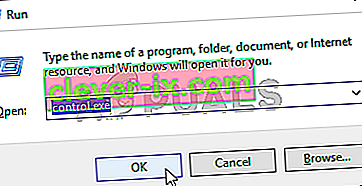
- Press “Windows” + “R” to open the Run prompt.
- Type in “Control Panel” and press “enter” to launch the classical Control Panel interface.
- Inside the control panel, click on the “Hardware and Sound” option and then select the “Power Options” button.

- Inside the power options, click on the “Choose what the power button does” from the left side.
- Click on the “Change Settings” option if the fast startup option is greyed out.
- Make sure to uncheck the “Turn on Fast Startup” option and save your changes.
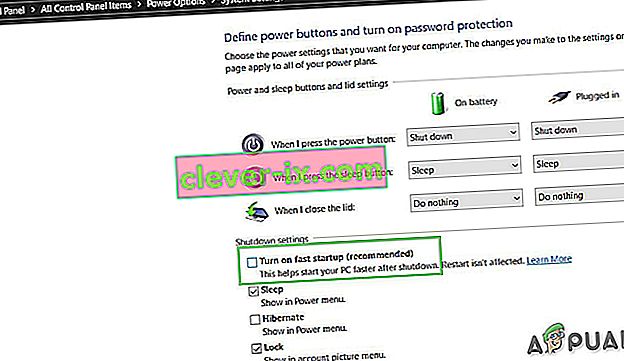
- Closeout of the window and terminate any unnecessary applications.
- Click on the “Start Menu”, click on the “Power Options” and select “Shutdown” from the list.
- This option should completely power down your computer and after performing a complete shutdown, wait for some minutes before turning your computer back on.
- After the computer turns back on, check to see if the error message is fixed.
Note: This solution can only be applied if you are able to sometimes boot up your computer normally and are only encountering this error momentarily.


Method 11: Repair Corrupted System Files
It also possible in some situations that certain system files might have been corrupted due to a storage failure or due to some other reason. Therefore, in this step, we will be performing a complete repair of the corrupted system files and then we will check to see if doing so fixes this issue. For that:
- Press “Windows” + “R” to open the Run prompt.
- Type in “cmd” and then press “Shift” + “Ctrl” + “Enter” to launch the command prompt with admin privileges.
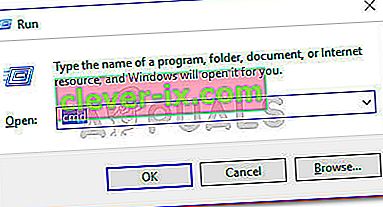
- Type in the following commands one by one and press “Enter” after each to successfully run an SFC scan and a DISM Scan on your computer.
DISM /Online /Cleanup-Image /RestoreHealth sfc /scannow
- Restart your computer completely once these scans are completed.
- Check to see if by performing these scans, you were able to fix this issue on your computer.

Method 12: Run Windows Startup Repair
Startup Repair is capable of diagnosing and fixing the found issues. For example, it can automatically scan system files, registry settings, configuration settings, etc. and try to fix the problem on its own. Startup Repair is especially useful when your computer is unbootable. Since your computer fails to boot, Windows can boot into WinRE automatically. While, if it doesn’t appear, you can interrupt the boot process three times in a row, and then the WinRE screen appears. Alternatively, if you have a bootable USB medium, you can also set your computer to boot from it and go to Repair your computer to enter WinRE.
After you have successfully booted into the Windows Recovery Environment, click on the “Troubleshoot” option, and from there, select the “Advanced Options” screen. Inside the advanced options, select the “StartupRepair” button to successfully initiate the Startup Repairing process. Windows will begin to diagnose your computer automatically. When the process ends, your computer will restart automatically. You can wait to see whether it can boot successfully.

Solution de contournement: assurez-vous qu'aucun périphérique supplémentaire n'est branché avant de passer à la ligne de commande ou à la réparation de démarrage, il est préférable d'essayer un autre redémarrage avec le moins de périphériques et de lecteurs externes connectés à l'ordinateur. Cela garantira que rien de ce qui a été récemment ajouté à l'ordinateur ne cause ce problème. Il serait préférable de débrancher toutes les clés USB, CD, DVD, etc. récents. Cela inclut également un lecteur de carte mémoire. Assurez-vous que tous les lecteurs externes et clés USB ou lecteurs de saut USB ont été déconnectés, puis réessayez.


